Polly® is an electronic Wi-Fi enabled braille learning device that teaches reading, typing, writing, vocabulary, and spelling in both contracted and uncontracted braille using a gamified approach. With immediate feedback, incorporation of music, and competitive games, Polly puts the fun into learning braille! This device includes multiple input methods, a speaker for instruction and feedback, and an online teacher portal that allows remote access and progress monitoring for educators/parents. Polly contains both a 6-dot braille keyboard and an electronic slate to accommodate the preference of the user.
Shipping Limitations: This product only ships to the United States. Orders outside these regions will not be processed.
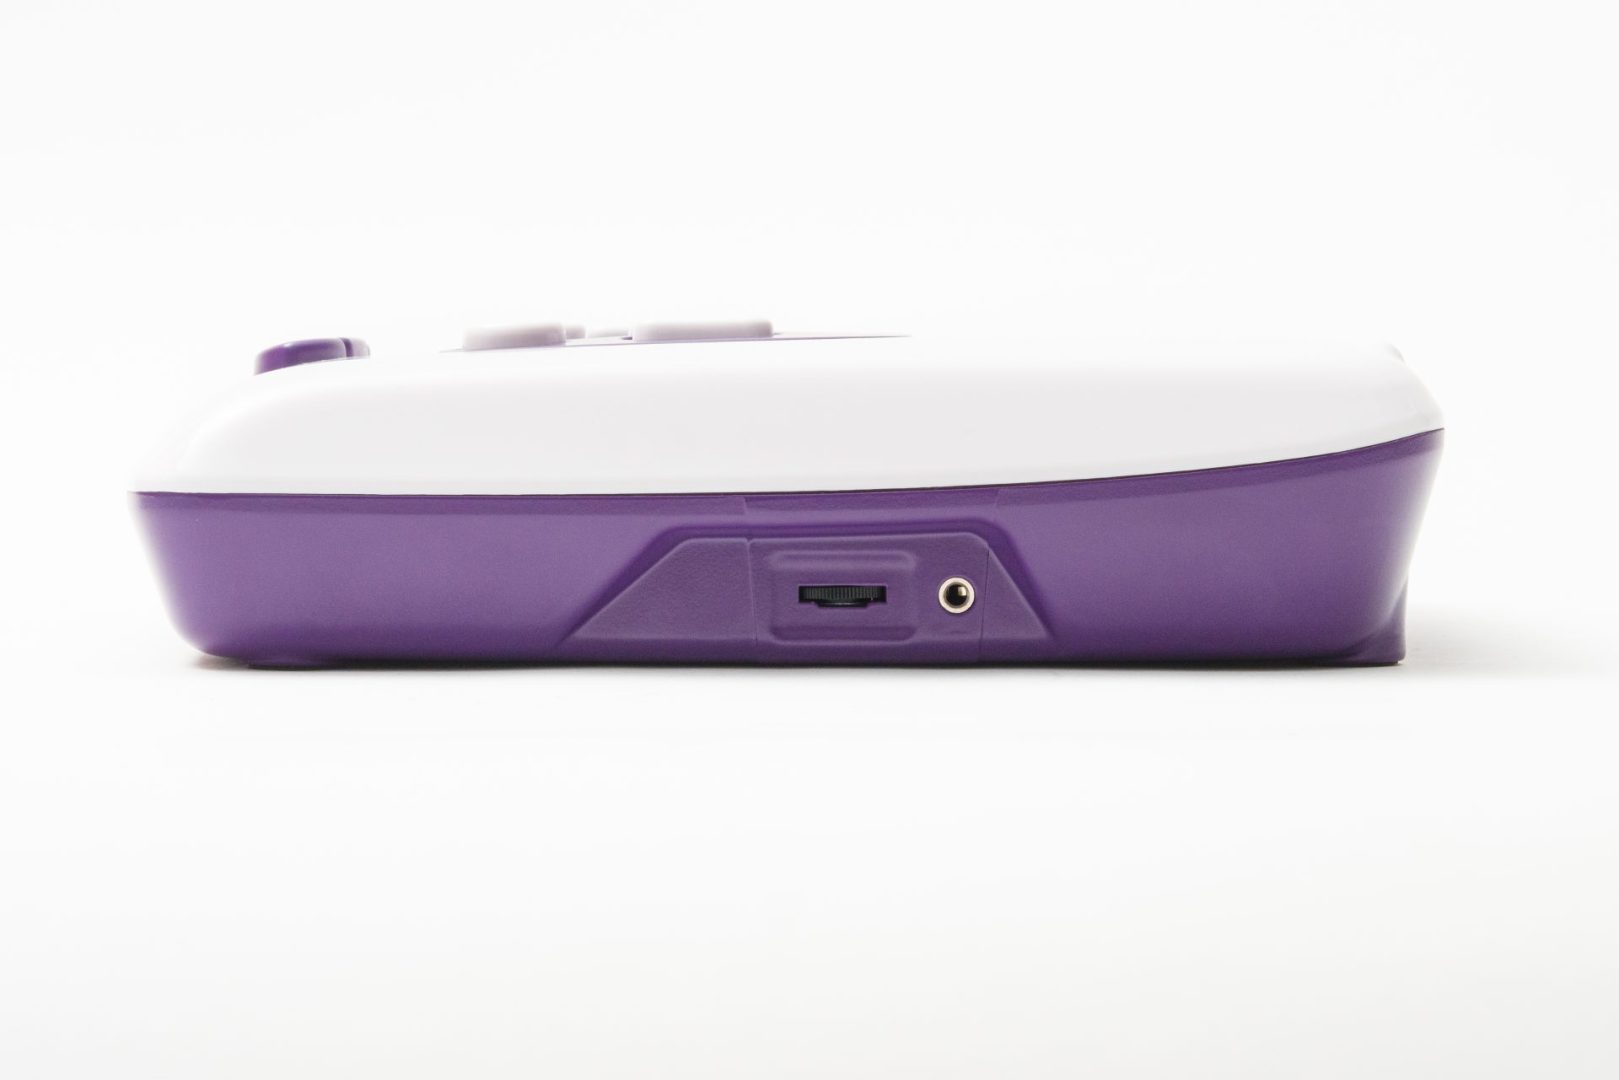
Created in partnership with ThinkerBell Labs, Polly® is an electronic Wi-Fi enabled device that will assist users in learning and reinforcing braille concepts. It has many components for both input and output. Output includes: 6 standard braille cells, 2 large braille cells, and a speaker/headphone jack for auditory instructions. Input includes: 6-dot braille keyboard, large dot display, and an electronic slate. Custom controls include a volume control, two USB ports, an Ethernet port, and a repeat button. An online website that can be used by teachers to assign lessons and track progress is included with purchase.
Both contracted and uncontracted braille curriculum content are available through Polly. Lessons include vocabulary provided in the context of short stories and spelling instruction for CVC words. Several games and an independent vocabulary mode are also available to reinforce braille learning content. The electronic slate and braille keyboard allow students to develop writing skills that will promote independence in multiple environments. Teachers can create individualized Spelling/Vocabulary lessons and customize the lesson order for student’s learning needs through the online portal, Helios – allowing Polly to be used as a supplementary tool for any braille curriculum.
The Braille Alphabet and Braille Alphabetic Word Signs by Jack Hartmann are additional learning resources included with Polly. These songs were developed to assist students who are blind or low vision to learn the Braille Alphabet and corresponding word signs.
Stay up to date with all things Polly, by subscribing to the email group by sending an email to polly-request@freelists.org with ‘subscribe’ in the Subject field OR by visiting your Polly list page.
Watch our APH product expert give a tour of Polly in this video.
Polly does not have a battery, just plug directly into a wall outlet using the included power supply
Includes curriculum for both uncontracted and contracted braille
Access to Helios, an online teacher portal, for tracking progress, assigning lessons, and customizing content/device
Polly device
Saddle stylus
Power supply
User manual
Access to Helios
Jack Hartmann Alphabet songs
“There are a lot of districts where TVIs are limited. This device could supplement the braille instruction that many students don’t have access to from their TVI. It would be great for when a parent is the only help available.”
“The quality of the instructions is impeccable. Very descriptive and clear. Easy to follow and understand.”
“Whack a braille and Whack a key are fun, easy simple games.”
“Letter Race Fun! Great game! I like how the letters come up on both the big cell and the refreshable display”
“Grade 1 explorer: I can see a lot of students getting a lot out of this one – kids love to type and then say “what did I write?””
“Alphabet part 1 reading and typing proficiency test: Good test and good assessment activity.”
“Many of the students we work with are not on grade level. Hopefully Polly will be a tool to help them get there.”
How do I whitelist my Polly?
If the Wi-Fi network requires you to log in to validate your credentials, you will first need to use these whitelist instructions before connecting Polly to the Wi-Fi network. The administrator over the Wi-Fi network can whitelist your Polly, allowing it to connect to the Wi-Fi network without needing to validate credentials. Whitelist means that your Polly has been added to a list of approved devices on your network, and this must be done by the administrator of the network. The network will remember the Polly unit, and you will not need to go through this process every time you connect to the network with your Polly.
Get the MAC address of the Polly unit.
Navigate to “settings” in the Polly menu using the navigation keys.
Navigate to “run diagnostics to assist support team”.
Start diagnostics by pressing the spacebar key. Note that while in this mode the large braille cells will keep refreshing to let you know that you are still in this mode.
Prompt Polly to speak the MAC address by typing the letter m in braille (Keys 1, 3, and 4 simultaneously).
Whitelist the device with the Polly’s MAC address on your Network Management System to access the internet without requiring a portal login.
The following domains are accessed by Polly over HTTPS (port 443) and SSH (port 22). These also need to be added to have the full functionality of Polly.
www.Thinkerbelllabs.com (for braille learning analytics over the Helios web application)
us-east-1.amazonaws.com and all sub-domains (for over-the-air updates)
www.Dataplicity.com and all sub-domains(for remote diagnostics in case of support issue – this is disabled unless explicitly started by user)
Your Polly Is now whitelisted and ready to be connected to the internet.
How do I connect my Polly to Wi-Fi?
If the Wi-Fi network requires you to log in to validate your credentials, you will first need to use the whitelist instructions before connecting to the Wi-Fi network.
Turn on Polly.
In the main menu use the directional keys to navigate to “settings”. Press the spacebar to select.
In this menu select “network settings”.
In this menu select “modify Wi-Fi settings using a web browser”.
Polly will then activate a local network called PollyHotSpot followed by the ID number of the Polly unit.
Connect to the PollyHotSpot with a different device such as a smartphone or computer.
Once connected to the PollyHotSpot, open a web browser and in the URL bar type in 10.0.0.2
This opens the Polly Wi-Fi Configuration Portal.
Select the button “add new”.
Available networks will now be displayed. Select the network you want to connect to.
If your desired network does not show up, select the option to enter the details manually.
Input the passphrase or password for the network.
If your Wi-Fi does not require a password, select open network.
Select the “save” button.
With the network saved, select restart Polly.
Polly will now automatically restart and be connected to your network. During the startup process Polly will say “Polly is connected to the internet.”
Helios FAQ
Basics
How do I sign into Helios?
You can sign-in to Helios with your email address or Google Account. If you are using an organizational email address and facing issues with a sign-in link, you can sign-in with an email OTP (one-time-password).
How do I access the online Quick Start Guide?
The Quick Start Guide for Polly™ is available on the ThinkerBell Labs website. There is also a QR code located on the insert contained inside Polly’s box. Be sure to read the Quick Start Guide before you switch on the device and use your Polly for the first time.
How do I navigate within Helios?
Once signed in, you will be able to see quick access pages on the left sidebar. Simply select the desired topic to navigate to pages such as Learners (student accounts) or Pollys (if you have multiple Pollys under your supervision). To view your account permissions, select the Account link.
You can show or hide sidebar labels by selecting Toggle Mode from More in sidebar.
How do I sign out of Helios?
You can sign-out by clicking the sidebar or navigation bar’s More button and selecting Sign Out.
Learners
What are learners?
The Learners category lists the users (braille learners) you have registered to Helios. The Learners menu provides a brief overview of learners, their default Pollys, and when they were last online.
The fields listed for a Learner are as follows:
Nickname: Nickname given to the learner. The nickname is assumed to not be the same as the child’s real name, email address, screen or username that functions as online contact information, or a persistent identifier that can be used to recognize a user over time and across different websites or online services.
Progress: Percentage and count of lessons completed by the learner.
Stars: Polly Stars earned by the learner. Awarded for excellence in Polly Performance.
Polly: The Polly assigned to this learner.
Active: When the Learner was last active.
Edit: Select to edit the learner details, if applicable.
To edit details of any learner, select the edit button on in the table. To add a new learner, select the Add Learner at the top left of the screen.
To get expanded view for a learner, select the learners name.
How do I Add a Learner?
A Learner (braille learner) account is recommended for usage tracking, analysis, and report generation. Once you have added a Polly and your account is activated, you will be able to add learner to your account.
To add a learner, select “Add Learner” from Dashboard, or by navigating to the Learners and selecting the Add Learners Page. Helios requests the following fields when you add a learner:
Nickname: Required. Used to identify different learners. Please do not use a username, email address, or the real full name of the child, which could be used to identify the child across different online services. The nickname is assumed to not be the same as the child’s real full name, email address, screen or username that functions as online contact information, or a persistent identifier that can be used to recognize a user over time and across different websites or online services.
Nickname Audio: Optional. This takes up an audio file containing pronunciation of the user’s nickname. You can also use the browser to record the audio. Please do not use learner’s voice for this recording. The audio will be assumed to be of a non-minor person. Polly will speak out the learner’s nickname to welcome the learner on their assigned default Polly.
Learner Type: Required. Teacher or advanced users can access any lesson at any time on Polly. Regular learners follow the recommended learning path – More lessons unlock as the learner progresses through the course.
Default Polly: Optional. Assigning a Polly to a learner automatically logs in the learner on Polly. This is the recommended way to use Polly. If unassigned, learners will be prompted to enter a user-key and pass key on Polly.
Consent: Required. As per data privacy regulations, you must give explicit consent for a learner’s information. Please note that Helios does not collect any personally identifiable information about the Learner.
Click Save to confirm the information. You will receive the confirmation email shortly. Once confirmation is received, the learner’s account will be activated.
To edit a student’s profile, select the edit button while on the Learners screen or while viewing the learner’s profile.
What is the difference between the types of learner accounts?
Teacher account gives access to all content while continuing to save progress. Student accounts require an introduction to be completed first before continuing through lessons in natural progression.
How do I activate multiple learners?
Contact Thinkerbell Labs, support@thinkerbelllabs.com, if you would like to activate multiple learners on your admin account.
Polly
How do I add a Polly?
If you have purchased a Polly, look for the Activation Key by scanning the QR code at the bottom of your Polly device, or by scanning the QR code on the welcome card in your Polly’s box. Helios will prompt you to Add Polly if you have not done so already. You can add another Polly by navigating to the Add Polly Page from Pollys (given that you’ve permissions to do so). Once on Add Polly Page, paste or enter the activation key in the box and click on Verify. Once the Polly is verified, you will see an image of your Polly in the prompt with the Polly ID (also located at the bottom of your Polly device or included in your purchase order), click Add to finish adding your Polly.
If I have multiple Polly units, how can I differentiate between them?
The Polly link will provide a list the Pollys purchased and added to your account.
The fields listed for a Polly are as follows:
Polly Icon: Displays the Polly’s color and appearance
Polly ID: Unique identifier for Polly. Also printed on the sticker at the bottom or found in Polly’s settings.
Nick Name: Nick name given to the Polly. You can edit your Polly’s name by clicking on the Polly ID.
Learner: The Learner assigned whom this Polly is assigned to.
Active: When the Polly was last active.
Settings: Select to view and edit Polly settings, if applicable.
Account Features and Permissions
How does the Account and Permissions page benefit me, as a teacher?
The Account screen displays information about your Helios account. Helios works on levels of access. Once you register a Polly you bought, you are given “ADMIN” access. This is identified by a badge next to your profile in the sidebar. If you are invited to Helios by someone else, you are granted access as given by the invitee.
All Admins can invite other users to Helios. These are displayed on the Linked Accounts. The various permissions you can give a user are as follows:
Report: Get static non interactive reports of usage. Basic learner details only are shown as an overview.
Analyze: Get detailed dynamic reports of usage. Detailed reports and full learner details are shown.
Curate: Control content and settings. This control grants access to prioritizing specific content for the user.
Meta: Add or edit learners and settings.
Restricted Mode: If you do not wish to grant access to full dashboard, you can alternatively grant access to select Learners and Pollys with restricted mode.
If you are an admin, you can optionally invite other people to Helios, with various permissions.
What are the benefits of the Report menu?
Report displays overall usage statistics within a given range of all the learners registered under your account. There are two charts displaying active learners per given date, and total time spent per given date. Select a time range to display and a list of active learners will appear, showing the time spent on the device by each learner. Click on a learner to navigate to the learner’s detailed progress report.
Switch-operated sensorimotor product excellent for designing tactual proprioception learning routines. Use this water repellent vibrating pad for sensorimotor routines as…