Produce high-quality braille and tactile graphics with PixBlaster™!
Detailed and thorough embosser set-up and other training tutorial videos help to make using your embosser in the classroom or at home as easy and efficient as possible.
Shipping Limitations: This product only ships to the United States. Orders outside these regions will not be processed.
$4,295.00
Federal Quota Eligible
Please contact SALES@APH.ORG for ordering information, as shipping constraints prevent online purchases in your country.
APH has partnered with ViewPlus Technologies to make an embosser available with Quota funds for the first time ever!
PixBlaster easily produces double-sided interpoint braille with smooth, rounded dots for improved readability along with industry-leading, high-quality tactile graphics with seven variable dot heights for color representation. Connect to Wi-Fi to translate and emboss documents on the fly from your computer or mobile device using the included PIXie box.
If you would like to request embossed samples from the PixBlaster and/or PageBlaster embossers, please email APH Customer Service at support@aph.org and be sure to include your name and full mailing address.
To obtain your Tiger Software Suite (TSS) license number, visit the ViewPlus American Printing House warranty page and complete the registration form. You will be asked to enter the purchased embosser’s serial number, the Order Number, and your email address. A 16-digit license number will be emailed to you from ViewPlus Technologies, Inc. – within 1 to 2 business days. The TSS works for 30 days without a license. We recommend that you complete the license registration form during those first 30 days to avoid any gap in usage of the embosser.
Works as a printer on any business or home network
Seven variable dot heights to accommodate enhanced tactile graphics.
Prominently features, is compatible with, and makes use of APH’s braille transcription software, BrailleBlaster.
Supports Duxbury and other popular translation programs.
Includes accessibility features, such as tactile, accessible labels on the control panel.
Is compatible with Mac, PC, and mobile devices.
Continuous tractor-fed paper.
Supports a paper width of 7-12 inches (17-305 mm) and a paper weight of 33-120 lbs (90-200 gsm).
Produces single-sided and double-sided interpoint braille.
Free-form dot placement with a minimum dot spacing of 1/17 inches.
Prints up to 120 characters per second (CPS).
Tactile resolution of 100 dots per inch (DPI).
Three adjustable braille dot heights.
USB (1.2, 2.0), ethernet, and Wi-Fi (with PIXie) connectivity.
Access to Tiger Software Suite (TSS)
Compatible with Windows 7, 8, 8.1, 10, and 11.
PIXie box (for wireless connectivity)
PIXie power adapter and USB PIXie flash drive (includes PIXie reset file)
Speaker and USB-A to Mini-B power cord
USB-A to USB-B printer cable
USB PixBlaster flash drive [includes driver, User Guides, and software: BrailleBlaster and ViewPlus Tiger Software Suite (TSS)
QR code (on embosser) links to online training videos
Quick-Start Guide (print and braille hardcopies)
Hardcopy tactile graphic and braille samples
PixBlaster embosser
Does the Tiger Software Suite (TSS) come with the purchase of PixBlaster? How and when do I obtain the TSS license number?
Yes, every PixBlaster comes with a license for Tiger Software Suite (TSS) that is good for two “seats.” Ex Officio Trustee (EOTs) will want to be careful how they manage these installations because they are tied to the PixBlaster embosser. A seat can be disabled by following the uninstall process and disassociating your seat. You can remotely disable a seat by contacting ViewPlus Customer Service. For installation, please follow the instructions from the setup program. For use of the Tiger Software Suite (TSS), please refer to the TSS User Manual. You may also view the Tiger Software Suite 7 Webinar on YouTube.
To obtain your TSS license number, visit the ViewPlus American Printing House warranty page and complete the registration form. You will be asked to enter the purchased embosser’s serial number, the Order Number, and your email address. A 16-digit license number will be emailed to you from ViewPlus Technologies, Inc. The TSS works for 30 days without a license. We recommend that you complete the license registration form during those first 30 days to avoid any gap in usage of the embosser.
What should I do to resolve a paper jam?
To resolve paper jams, see the Resolving Paper Jams section in the PixBlaster User Guide or follow these six steps:
Tear off the paper at the closest perforation to the embosser, for both the paper input and output.
Open the tractor feeder lid, and release paper from the tractor pins if still engaged.
Pull on visible paper on the output (front) side of the machine; take care to distribute pulling force evenly across the paper to prevent tearing.
If the paper does not pull out completely from the front, remove any remaining paper from the rear of the embosser; take care to distribute pulling force evenly across the paper to prevent tearing.
(Alternative step) You may also try the Up and Down Arrow buttons on the Operating panel to support paper moving out of the machine.
In the rare event that there are still scraps of paper left behind in the embosser, fold a thick sheet of paper in half, insert the sheet into the embosser over the tractor feed, and move the sheet from side to side to free paper remnants.
Once the paper jam is clear, insert paper again, engage tractors, close the lid, and reprint the document.
If you are unable to resolve a paper jam, please contact APH directly for additional assistance.
Send an email to support@aph.org or call APH Customer Service at +1 (800) 223-1839
What is the purpose of the PIXie box and the PIXie USB flash drive that comes with it?
The PIXie box is an accompanying piece of equipment with PixBlaster that allows you to connect wirelessly for quick access to printing.
The PIXie USB flash drive contains a reset file, in the event you were to need it. You can only access PIXie if it is on the same network as you. If you’re on a different network and would like to access PIXie, you’ll need to reset PIXie using this flash drive. Plug in the flash drive, unplug PIXie, and then plug it back in. Once it starts up, wait five minutes and then remove the flash drive. PIXie is now reset, and you can change the Wi-Fi settings so it is on the same network as you.
How do I set up PIXie for Wi-Fi connectivity?
You can achieve Wi-Fi connectivity in five easy steps, listed below. (Also refer to Getting PIXie Ready for Use in the PIXie User Guide.)
Open Settings on your mobile device and select Wi-Fi. Known networks are listed.
Select PIXie network. Connection to Wi-Fi happens automatically. Your device recognizes that PIXie does not have internet access and might try to disconnect and connect to a different Wi-Fi network instead (because the known network with internet access is preferred by your device). You may need to acknowledge that you want to stay connected, and possibly also select Forget Other Networks and turn off mobile data.
When successfully connected to the PIXie Wi-Fi network, open your preferred web browser application.
Enter http://10.10.0.1 for PIXie dedicated IP address, or URL address http://PIXie within the address line. The PIXie Home webpage opens. Depending on the APH embosser model that you have currently connected to your PIXie, printer-specific information is displayed. With no embosser connected to PIXie, printer-specific information is not available. You can switch between the sections Home, Formatter Settings, Legacy Settings, and System by selecting the center-left menu items.
Go to System page for Wi-Fi Direct or Wi-Fi Network Client configuration settings.
How do I get the best braille and graphics from my PixBlaster?
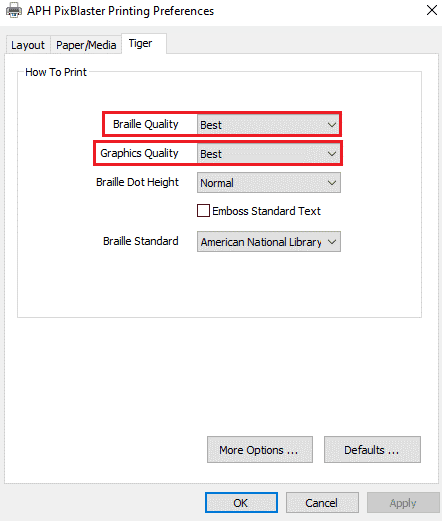
With PixBlaster you get to choose your desired braille quality by selecting Draft, Standard, or Best. Printing with Draft dot quality is the faster option. Standard or Best dot quality produces rounder, smoother dots, but slows down the printing process. If using PIXie, braille quality is adjusted via the PIXie interface and is found under the Tiger Tab. There are options for both Braille Quality and Graphics Quality. The Best setting is recommended. It is slower, but produces better quality dots. If you are not using PIXie, access the Printing Preferences as thoroughly explained in the PixBlaster User Guide.
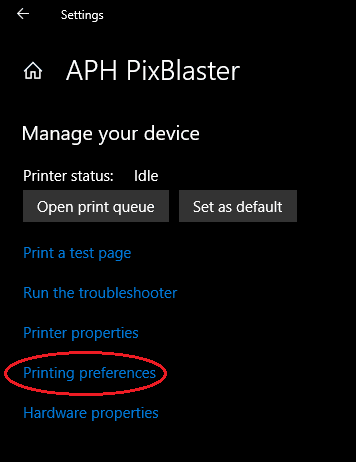
Using the PIXie Interface on Windows:
Press Windows key
Type printers
Press enter
Select APH PixBlaster and activate the Manage button
Select Printing Preferences
Select the Tiger Tab
Select “Best” for both Braille Quality and Graphics
Note: Printing will be slower but the quality is higher.
Does PixBlaster come with a warranty? Are extended warranty options available?
Please contact sales@viewplus.com for more information about extended warranty options.
What is the importance of the shipping bolt?
The shipping bolt is placed in PixBlaster prior to shipping to avoid the printer head moving within your embosser. Before using, please remove the shipping bolt and store it in the plastic retaining loops on the inside frame. The shipping bolt is located inside the rear lid of the PixBlaster underneath a strip of tape that is blue. Remove the tape and then unscrew and remove the shipping bolt. It can be stored securely in the two metal prongs to the right of where you removed it and you will need to reinsert it if you ever need to ship the embosser.
IMPORTANT: Before packing up PixBlaster embosser for shipping, make sure to reinstall the shipping bolt. You may need to tilt the embosser gently to the side with the power button until you hear a sliding sound to allow complete insertion of the shipping bolt. Screw and tighten the shipping bolt securely. Replace the tape to hold the lid on the embosser. Reinsert PixBlaster into the original plastic bag and add the side-specific foam end caps to the embosser. These shipping instructions are mandatory otherwise the warranty is voided.
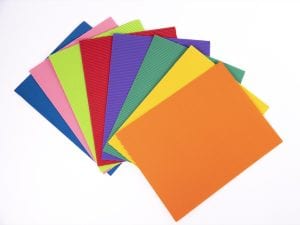
What kind of paper can I use with PixBlaster? Is tractor-fed braille paper required?
Paper width can vary from 7 to 12 inches (or 176 to 305 millimeters). The paper weight can be 33-120 lbs.
Yes, 8.5″ x 11″ or 11.5″ x 11″ continuous tractor-fed paper is required.
My PRN file will not emboss to PixBlaster, what can I do?
PRN files are made for specific embossers; open the file in Tiger Designer, go to File > Save and then Save As a PixBlaster PRN.
Are the buttons and labels on the embosser’s control panel accessible?
Yes. Many features of PixBlaster are with accessibility in mind, including labels and buttons on the control panel.
Does the PixBlaster support embossing from a notetaker?
Yes. The PixBlaster will work with any notetaker that has a USB connection and supports CUPS printing. Some examples of notetakers that work with PixBlaster are the BrailleNote Touch+, the BrailleNote Apex, and the BrailleSense U2. It is also possible to emboss via Wi-Fi to the PIXie using a Wi-Fi enabled notetaker. If you are unsure about your notetaker, contact the manufacturer and ask if it supports CUPS printing.
Does PixBlaster support music braille?
PixBlaster embosses a BRF created using music braille but otherwise cannot within itself create a music braille file. You could use Duxbury, Braille2000, or BrailleBlaster to make a music braille file with different levels of automation for each.
Is it important that I keep the shipping box and the packaging materials?
Yes, it is important to keep all packing material in the rare case that damage occurs during shipping or if the embosser needs to be returned for repair at a later date. Be sure to inspect the embosser when unpacking and checking for damages. If noticeable damage occurred during shipping, notify APH immediately.
IMPORTANT: Save the packing material and shipping box. The packing material must be used to ship PixBlaster for warranty maintenance service and to settle any insurance claim.
What file types does PixBlaster support?
Braille: BBZ, BRF, BRL, TXT
Graphics: PRN, PDF, JPG, PNG
Via TSS: DOCX, PDF, Excel
PixBlaster Mac FAQ
1. How to install?
Installing the PixBlaster driver on a Mac
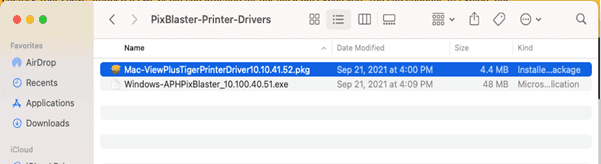
Open Safari and go to aph.org.
Search for PixBlaster and you should find a link for the drivers. The zip archive contains both the Windows driver and the Mac driver. Download the archive and open it. Identify the Mac driver with the filename extension of .pkg.
Open the .pkg file.
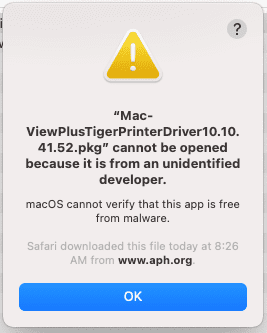
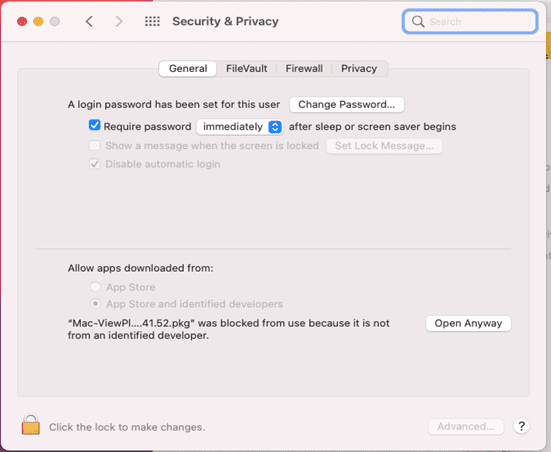
You may encounter a message stating the file could not be opened because it came from an unidentified developer.
If this happens, click the Apple menu, System Preferences, Security & Privacy.
Click Open Anyway.
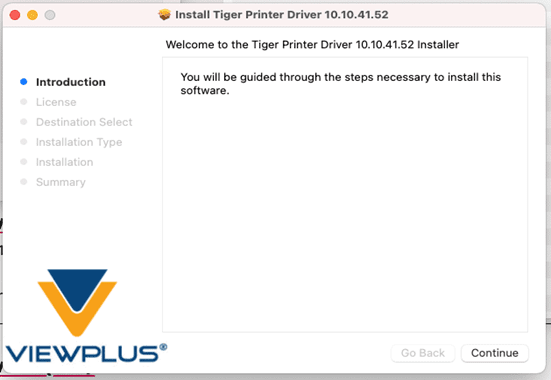
The installer should launch.
Please continue through the wizard. You do need to accept the license agreement.
Please connect the embosser by its USB cable to the Mac.
Click the Apple menu and open System Preferences.
Open Printers and Scanners.
Select your APH BixBlaster.
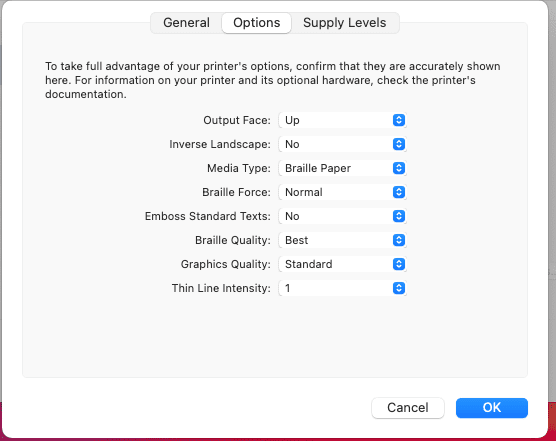
Click Options & Supplies. Click Options.
Set your Media Type to Braille paper. This affects how hard the solenoids hit the paper.
Set Braille Quality to Best.
You may need to experiment with Graphics Quality. Standard is fine in most cases. Best is much slower, but the vertical dot density is higher. Tiger17 will produce output that is limited to a 17 DPI grid. It might be preferable for some graphics containing fills.
Applications in Mac OS should be able to set options like paper size and margins.
For example, in Pages you can click Document at the top right, then the Document tab. Select your APH PixBlaster as the printer and the paper size should be 11.5×11 in (Office 2010). It is important to use this form when printing on 11.5×11 in paper because it tells the application that the size is 11.5×11.5 inches. Many applications will rotate the output 90 degrees thinking portrait mode should put the smaller dimension on top and bottom. The embosser’s firmware will not advance the paper 11.5 inches per sheet.
2. How to print from a Mac?
File>Print>Emboss (once drivers are installed)
3. My PRN file will not emboss to PixBlaster on Mac, what can I do?
PRN files can be sent to the PixBlaster through the Pixie.
4. Does the PixBlaster support embossing from a notetaker on a Mac?
A notetaker would need to be connected via a USB cable directly to the embosser. Some notetakers support AirPrint and will find print servers through the WiFi network. If the Pixie is on the network the notetaker should be able to send the print job to the embosser through the Pixie.
5. What file types does PixBlaster support on a Mac?
The Mac OS file types are supported through the Pixie.
6. How do I access Legacy Settings on a Mac?
Mac does not provide access to Legacy Settings. Use a TigerBox/Pixie, or a PC to access Legacy Settings.
7. If there is a missing audio file, how do I access the audio file from the PixBlaster onboard menu from a Mac?
The following link is to the utility that installs the audio files: https://cloud.viewplus.com/index.php/s/e6hrmlBJ4sW7TEE
The utility runs on a PC. Before you run it, open the print queue for your PixBlaster so you can identify it.
Open the file and use the drop-down combo box to select your PixBlaster. If the PixBlaster is connected and ready you will see the serial number and firmware version filled in.
Click Install Audio Files.
You will see a print job appear in the print queue. This takes a long time and there is no progress indicator. The light on the panel will be blinking as the PixBlaster receives data. Be patient. After maybe 30 minutes or more the PixBlaster will beep. Look at the print queue and you should see the print job is complete. You can close the utility.